If you work in a customer facing position at a company using Gmail, setting up a Gmail signature could save you lots of time. Setting a default signature ensures that the signature is automatically included in all outgoing emails.
You will be able to include information like your name, position at the company, email marketing links, phone number and a link to your online scheduling page. This text is automatically loaded at the end of each email and ensures that your customers always know who they’re speaking with.
(Psst…looking for a quick answer? Scroll down to the Signature Defaults section for quick access to the solution.)
Introduction to Gmail Signatures
A Gmail email signature is a block of text that is automatically added to the end of your email messages, much like a footer. This can include essential contact information, a favorite quote, or even a company logo.
Gmail signatures are a fantastic way to personalize your emails and promote your brand. You can customize your Gmail signature to include various elements such as your name, position, social media links, and any other relevant information.
Additionally, you have the option to add an image to your Gmail signature, making it visually appealing and professional. By setting up a Gmail signature, you ensure that your contact details are always included in your email correspondence, saving you time and maintaining consistency.
Why Gmail hides your signature
There is one setting in particular that will cause your email signature to disappear on reply emails. In this article we’re going to show you how to set up a Gmail signature so that it always shows up in your email correspondence.
Here’s what the hidden email signature looks like when you send a reply:
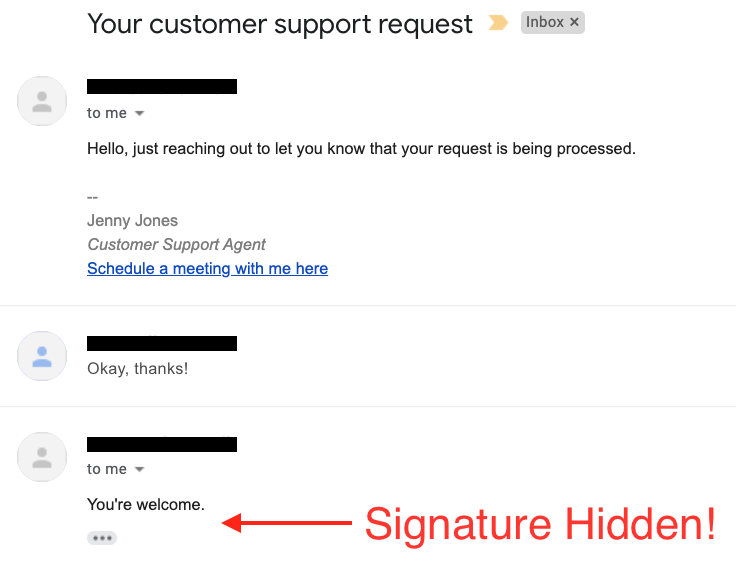
When Gmail sees the same text go out twice, it assumes that the recipient wants that data removed. In their effort to keep emails clean, they sometimes do professionals a disservice. By cutting off duplicate text, they remove email signatures that include important contact information!
Don’t worry about it though. We’re going to show you how to fix this so that your customers see your Gmail signature every time you send an email.
Setting up your Gmail signature
If you’re using your domain email on a free Gmail, log into your Gmail account and in the upper right corner of the dashboard, click on the Settings gear icon. When you do, a Quick Settings sidebar will appear. At the top is a button that you will need to click, labeled See all settings. Here is a screenshot of these two steps:
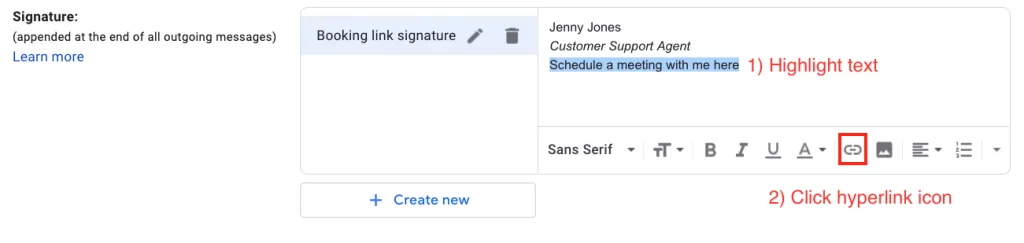
Upon clicking the See all settings button, a new screen will open labeled Settings. You will find that the General tab is open by default. Scroll down to the signature section and click on the Create New button. Doing so will allow you to generate a new email signature for your outbound emails. You can also add a signature image to make your signature more visually appealing:
In the new signature text area, share the information that should be included at the end of each email. This usually includes a minimum of your name, position, company name, and contact information. You can share a virtual phone number, social media links, or a link to your scheduling page.
Ensure your signature is correctly selected in the signature defaults section to guarantee its visibility during composing, replying, or forwarding emails.
Optional: Add an appointment scheduling link
Adding your scheduling link to your email signature can make it super easy for your clients and contacts to book a meeting with you.
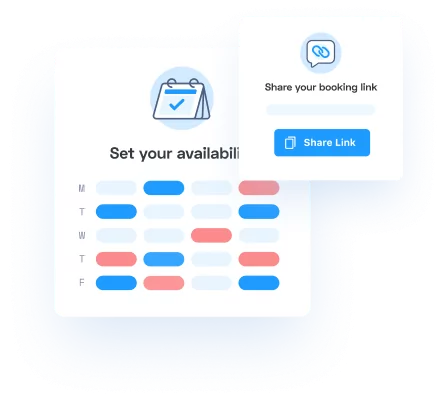
Don’t have a scheduling page yet? Appointlet is an easy-to-use appointment scheduling software trusted by over 250K users across the globe that integrates seamlessly with Google Calendar. You can try it for free today.
It’s super easy to add straight to your signature box inside your Gmail email signature.
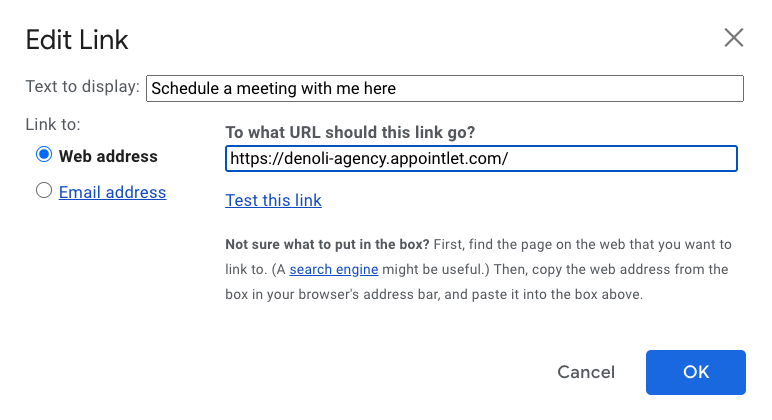
To link to your scheduling page in your Gmail email signature, highlight the appropriate text (e.g. Schedule a meeting with me here) and then use the hyperlink icon to attach your booking page URL to your email signature.
Best Practices for Email Signatures
By following these best practices, you can create an email signature that effectively represents you and your brand.
Include all the important information
Creating a professional email signature involves including essential contact information such as your name, title, and email address. It’s also beneficial to add social media links and a company logo to enhance your professional image.
Don't add too much clutter
However, it’s crucial to keep your email signature concise and easy to read. Avoid using too many images or excessive formatting, as this can make your signature look cluttered and unprofessional. A clean and straightforward email signature not only looks better but also ensures that your contact information is easily accessible to your recipients.
Keep it clear and professional
To create a professional email signature, start by opening your Gmail settings and navigating to the “Signature” section. Here, you can enter your name, title, and contact information. Additionally, you can add relevant social media links, scheduling links, and a company logo to enhance your signature.
It’s important to use a clear and concise format, avoiding excessive formatting or images that can clutter your signature. If you include a company logo or banner, ensure it’s visually clean — you can also change background colors or images to match your brand’s style. By keeping your email signature simple and professional, you ensure that it effectively communicates your contact information and represents your brand.
Consider changing your signature for events and promos
If you have a big promo going on or an upcoming event, consider including it in your email signature. Your email signature can be an excellent place to add links, advertise deals, add a call-to-action, and more. Just remember to change it back once the promo period or event is finished.
Save your changes
Once you’ve entered all the necessary information, don’t forget to save your changes to ensure your new signature is applied to your emails.
How to ensure your signature is always visible: Gmail Signature defaults
Now that you have a signature created, the final (and most important) thing you’ll need to do is configure the Gmail Signature defaults.
Step one: Navigate to the Gmail Signature Defaults
Navigate to the signature settings under the settings in your Gmail account.
Step two: Select your signature from the dropdown menu
To ensure that it’s always available, select your signature name from the dropdown menu for new emails and reply/forwarded emails. You can create multiple signatures for different occasions and select the appropriate one when composing a new message.
Step three: click on a specific checkbox
Then click on the checkbox that says “insert signature before quoted text in replies and remove the — line that precedes it.“
This is the desired configuration if you want your Gmail signature to always show. Clicking on the three dots in the email composer can help manage how the signature appears.
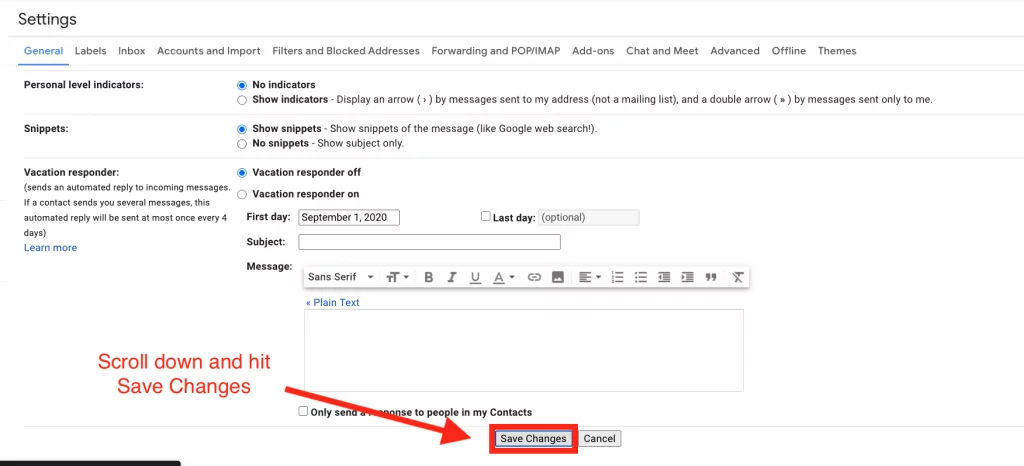
Step four: Hit save changes
When you’ve configured the Signature defaults, scroll down to the bottom of the page and hit Save Changes:
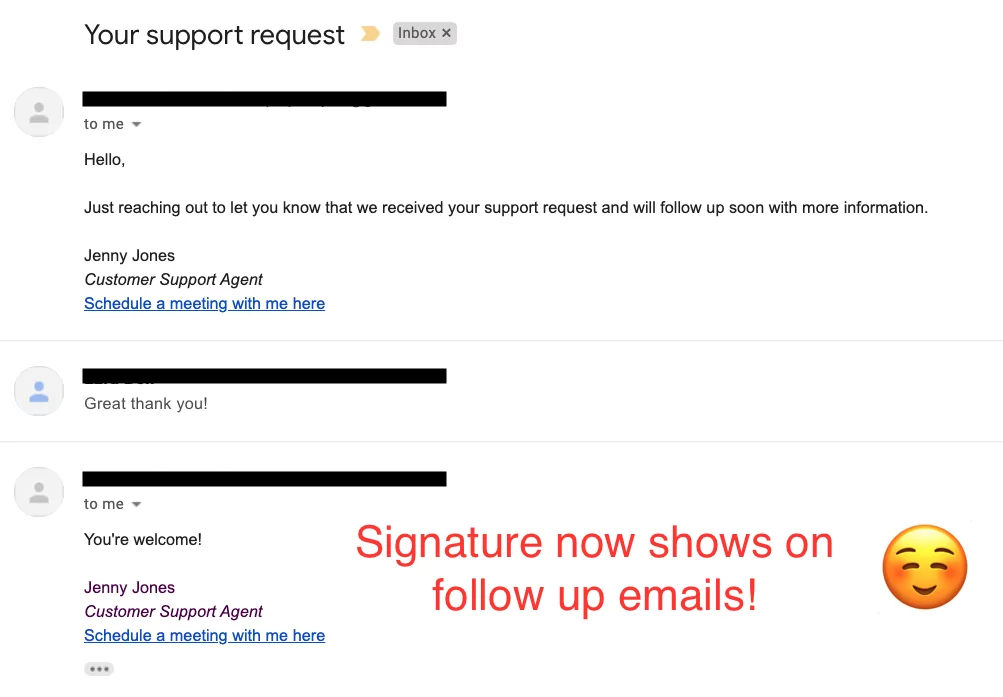
Step five: Confirm that your Gmail Signature works as expected
The final step is to test your signature. If you have a second email that you can test with, try emailing back and forth. When you respond to the email as shown below, the signature should now persist.
Gmail will still render the text purple to imply that it is repeat content, however all of the signature content should show as expected. Users should check how the signature appears in sent messages to ensure it is displaying correctly.
This is especially important for professionals where maintaining a consistent and informative email signature is crucial for effective communication with clients.
Still having issues? Troubleshooting your Gmail signature
If your signature still isn’t showing up, go through the steps above again and ensure you have everything selected properly.
If it still isn’t working try it with another browser and see if the problem perists. For example, if your signature isn’t showing in Firefox, try it in Chrome. If it shows in Chrome fine, it may be an issue with the browser.
If there’s still a problem viewing your signature in every browser then there may be issues with formatting or content. Try creating another signature with different images (or no images) and see if that resolves your issue. If it does, the HTML code may be too complex or the content may have been copied and pasted from external sources which introduced some formatting issues,
If none of these issues resolve your signature visibility issue, consider reaching out to Google directly or searching their support forums for specific guidance.
Final tips
To ensure your Gmail signature is always visible, make sure to set the correct defaults in your Gmail settings and test your signature regularly. Incorrect settings is the most common cause of signature display issues.
Using a professional email signature manager can help you create and manage your signatures more efficiently. Keep your signature concise and easy to read, avoiding too many images or excessive formatting.
This not only makes your signature look professional but also ensures it displays correctly across different email clients. Regularly check for common Gmail signature issues, such as character limits or display issues on mobile devices, to ensure your signature always appears as intended.
And don’t forget to add a scheduling link right to your email signature to make it easier to book with you. With a link to book a meeting in your email, your contacts can quickly schedule a meeting without having to navigate to your website. Before adding emails to your signature, it’s smart to make sure your contact list is clean. Using an email validation tool ensures your messages reach real recipients and reduces bounces.
By following these tips, you can maintain a professional and effective email signature that enhances your email correspondence.Bonus: How to write winning email subjects and body content to increase conversions
Bonus tips for amplifying the success of your email
While you’re here, we have a few other goodies to share. Check out our guide on how to write email subjects that convert along with our recommended sales email templates.
We collaborated with industry leaders G2 and ActiveCampaign to produce both of these articles. They lay out the core expectations for professional email etiquette in 2020 and beyond.
If you need to grab specific meeting links and drop them into your emails, rather than relying on the email signature exclusively, then Appointlet for Chrome and Appointlet for Firefox might be a good fit for you. You can try Appointlet for free today.
We hope this article was helpful — drop a comment below if you have any questions or requests for future articles!

Ezra Sandzer-Bell
Ezra is a SaaS product marketing manager and the founder of AudioCipher, a music software company. He previously worked at Appointlet as a customer success manager and marketer, helping business managers optimize their online scheduling workflows.