You take the booking, and then a quiet pile of admin tasks shows up behind it.
You now have to add the client to your CRM, send the intake form, send the Zoom link, add them to your email list, text a reminder the day before, make a note about how the meeting went, or create a follow-up task for next week. The list seems endless.
Each one only takes a couple of minutes, but when you multiply by every booking you take this week, you’ve spent half a day on admin you didn’t realize you were doing.
Most of this can be automated, and some of it Appointlet handles natively. The rest can be set up through Zapier in less than ten minutes per workflow.
Below are the eight things appointment-based businesses are still doing manually after every booking, and some insight for how to automate them.
How do I automatically add new bookings to my CRM?
This is the most common manual task we hear about. A booking comes in, you open HubSpot or Salesforce or Keap, and you type the same information your client just typed into your booking form. Or worse, your assistant does, and you pay them to do it.
The fix is a Zap.
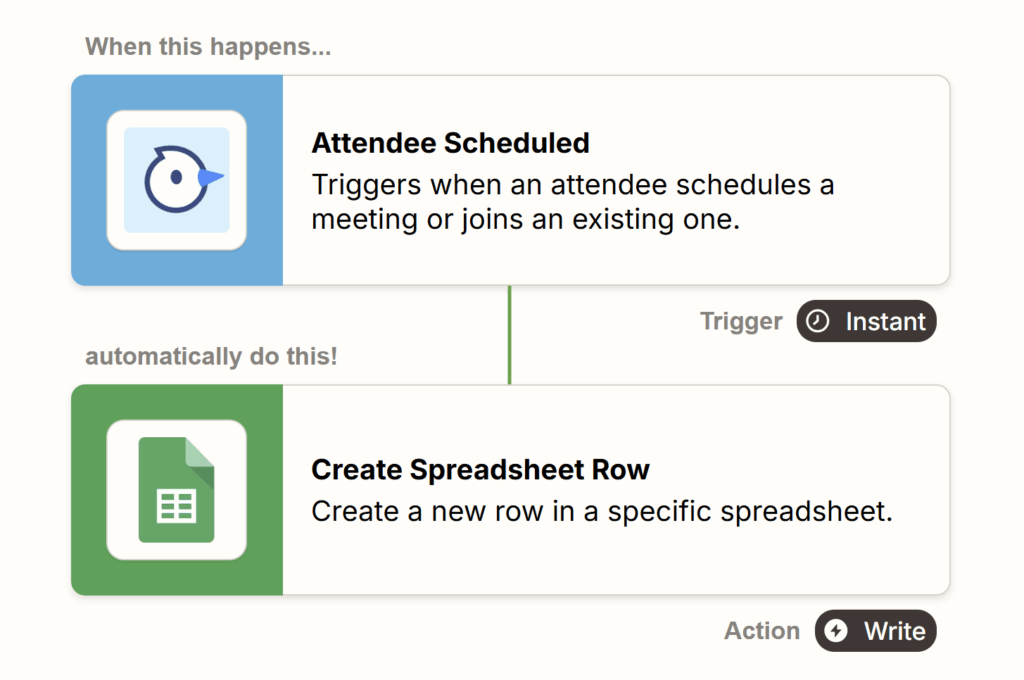
Appointlet can send your booking data through Zapier to any CRM of your choice. A new booking equals a new contact, which can be automatically created with the name, email, phone, and any intake form responses attached as notes.
This setup works with HubSpot, Salesforce, Keap, Pipedrive, Zoho, Copper, Insightly, Close, ActiveCampaign, Google Sheets, and most others.
If you’re using a CRM, Zapier almost certainly connects to it, and it takes about 10 minutes to set up the first time; after that, it runs forever.
Here’s an example of what that looks like if you’re using Google Sheets as a lightweight CRM (which a lot of solo operators and small teams do).
- You set up a Zap where every new Appointlet booking confirmation adds a new row to a sheet of your choice.
- The columns get filled automatically with the attendee’s name, email, phone, meeting type, booking time, and any intake form responses.
- You open the sheet on Friday, and the whole week’s bookings are already there, organized and ready to work with.
You can clone the pre-built Zap template for Appointlet and Google Sheets and have it running in about five minutes.
The same pattern works for whichever CRM you actually use. Pick your tool, pick the action (create contact, update record, add note), and the Zap handles the copying work you used to do by hand.
Can I collect payment when someone books an appointment?
Yes, and you should.
Most appointment businesses still invoice after the appointment. The client books, shows up (or doesn’t), receives the invoice a few days later, and then you spend the next two weeks following up about it. By the time it’s paid, you’ve forgotten what it was for.
Collecting payment at the time of booking solves three things at once. You get paid on the spot. You don’t have to chase invoices. And no-shows drop, because people who pay tend to show up.
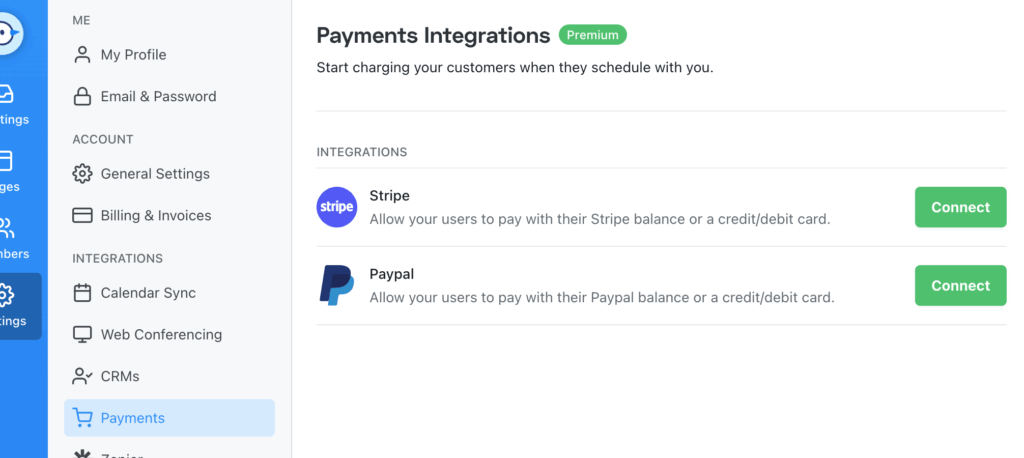
Appointlet integrates natively with Stripe and PayPal, so you can set a price for any meeting type, and clients pay before they can confirm the booking. You control the cost, the currency, and the refund policy.
This is one of the easiest changes you can make this week.
Setting this up takes only about five minutes. The full walkthrough for connecting Stripe to Appointlet is in our help center with screenshots of each step. PayPal also follows the same process if that’s your preference.
How do I collect intake forms before the meeting instead of chasing them after?
Move the form to the booking page itself.
Appointlet’s intake forms live on the booking page, which means clients fill them out before they ever see the confirmation. No follow-up emails, chasing, or walking into a session without prep. The form is required to complete the booking, so you don’t have to wonder whether they’ll get to it.
Setting up an intake form in Appointlet takes a few minutes per meeting type. The Appointlet guide to customizing intake forms walks through every field type with screenshots and has a sample form you can model yours on, so you can go read the article to find out more.
For the data side, you can push intake form responses anywhere through Zapier into your CRM software, a Google Sheet, or Asana as part of a task description.
The information goes where you actually use it, not into a confirmation email you’ll have to dig through later.
If you want to take this one step further, you can use AI to summarize each intake response before the appointment. We wrote about how to set that up in this guide.
How do I automatically send a Zoom or Google Meet link for every booking?
You can connect your video tool to Appointlet once, and every booking generates a unique meeting link automatically. The link goes in the confirmation email, the calendar invite, and the reminder. You don’t touch it.
Appointlet integrates natively with Zoom, Google Meet, Microsoft Teams, Webex, and GoTo Meeting. The unique-link-per-attendee piece is worth noting. It means early or late arrivals from one meeting can’t accidentally join another, which is something most schedulers get wrong.
Setup takes about two minutes. Most users connect this on day one and never think about it again.
The detailed step-by-step Zoom setup guide and the Google Meet setup guide are both in the help center with screenshots if you want to follow along.

How do I add new clients to my email list automatically?
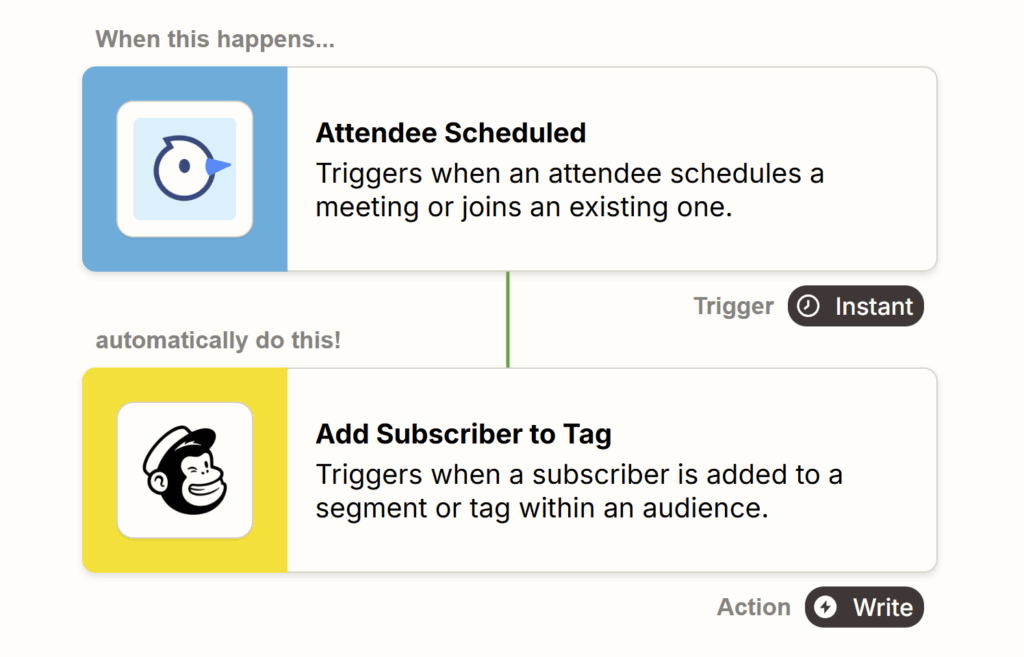
You do this the same way as you would with the CRM workflow. Essentially, booking triggers a Zap, which adds the client to your email list with whatever tags or sequences you’ve set up.
You can get specific with this.
For example:
- New “Discovery Call” bookings go into the new-client welcome sequence
- New “Follow-up” bookings go into a returning-client tag, or
- New “Free Consultation” bookings go into a separate nurture sequence with a different cadence.
This setup works with Mailchimp, ActiveCampaign, ConvertKit, Klaviyo, MailerLite, Constant Contact, AWeber, Drip, and Omnisend.
With this setup, you won’t end up with an email list that’s missing half of your actual clients, because the manual “I’ll add them later” step never happens. Automation closes that gap.
Here’s an example of what this setup can look like with Mailchimp:
- You connect Appointlet and Mailchimp through Zapier, and tell the Zap which bookings to watch (for example, all new “Discovery Call” bookings).
- You pick the Mailchimp audience you want the attendee added to and have it add a Meeting tag like “Discovery Call – New Lead,” so your welcome sequence knows which emails to send.
- You then save the Zap.
From that moment on, every new “Discovery Call” booking lands in Mailchimp as a tagged subscriber automatically, without you having to log in.
The Appointlet to Mailchimp Zap for tagged subscribers is already built, so you can clone it instead of starting from scratch. That page also has a long list of other Mailchimp workflows you can set up from Appointlet, like adding attendees to specific groups, triggering campaigns after a booking, or updating existing subscribers when they rebook.
You can check it out for more information, or visit the Appointlet page on Zapier to see other email apps you can use.
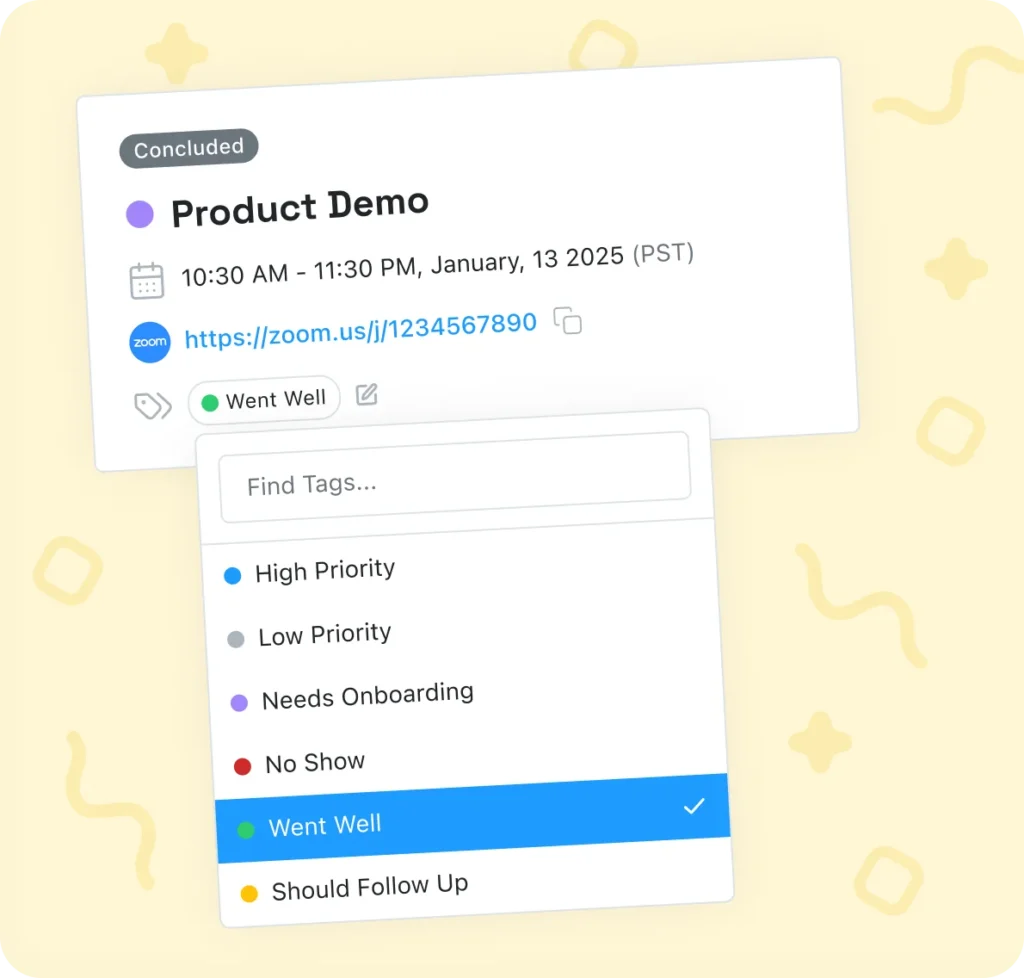
How do I track what happened in each meeting without sticky notes?
This is what Meeting Tags are for.
Tags let you classify meetings as they come in and after they happen.
Some common ones are ‘VIP’, ‘No-Show’, ‘Should Follow Up’, ‘Needs Docs’, and ‘Returning Client’. You can apply the tag manually, or set up rules in plain English and let Appointlet’s AI tag meetings for you. (AI auto-tagging is a Premium feature.)
Once tags are in place, you can filter your dashboard to see exactly what needs attention, run reports that include tags in the CSV export, and trigger Zapier workflows based on which tags get applied.
That last part opens up a lot. A No-Show tag can trigger a re-engagement email. A VIP tag can ping the team in Slack. A Needs Docs tag can fire off a follow-up reminder to the client. The tag becomes the routing layer for what happens next.
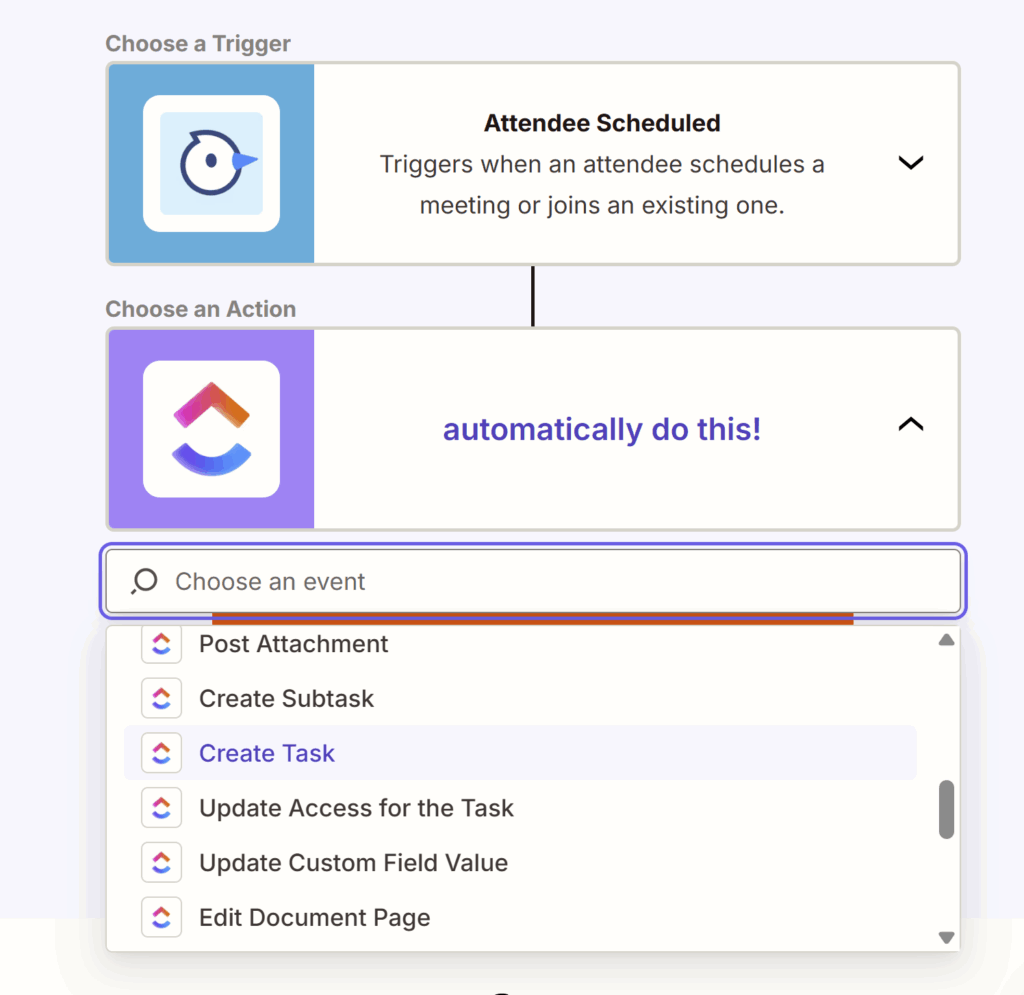
How do I automatically create a task or assign work after a booking?
Some bookings need follow-up work, such as ‘gathering prep documents’, ‘writing a quote’, ‘setting up a project’, or ‘scheduling a check-in’. Most teams handle this by remembering, which works until it doesn’t.
Appointlet through Zapier can create tasks in your project management tool whenever a booking comes in. The task can include the client’s info, the meeting time, and a due date relative to the appointment (the day before, the morning of, three days after).
This setup works with tools like Asana, Trello, Monday, Todoist, and ClickUp.
You can layer this on top of Meeting Tags to get more specific. A “Needs Docs” tag can trigger a task assigned to the front-desk person. A “VIP” tag can trigger a prep task assigned to the senior team member. So, the tag determines who gets the work and what kind of work it is.
Here’s an example of what the automation could look like for a follow-up task like ‘gather prep documents’, set up with ClickUp.
- Every time someone books a Discovery Call, a Zap creates a new ClickUp task in your “Client Prep” list, titled with the client’s name and meeting date.
- The task description gets populated with the intake form responses,
- the due date is set to two days before the appointment,
- and it’s automatically assigned to whoever on your team handles prep.
You don’t have to remember to create the task. It’s waiting in your or your team member’s queue the morning you or they need to start on it.
Browse the full list of Appointlet and ClickUp integrations on Zapier, and you’ll see there are a lot of options available to you: create tasks, create subtasks, update task status based on booking changes, log cancellations, add meeting details to existing projects, and more.
You could set up dozens of workflows here, but you don’t have to. Pick one small thing like the prep task above, get it running, and see if it sticks. Then add another next week or next month if it helps.
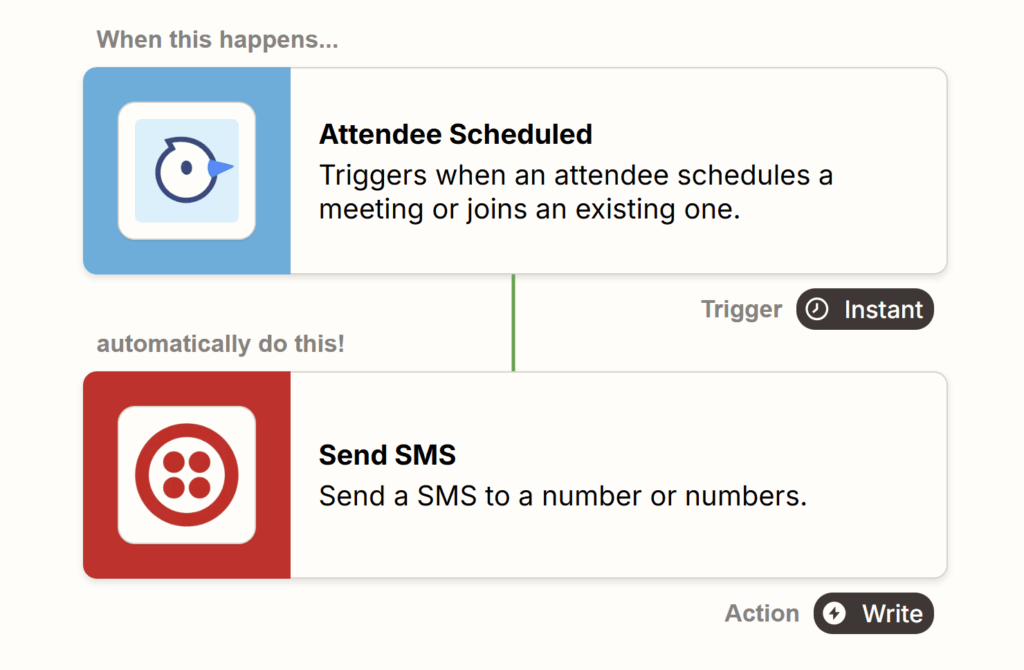
How do I send SMS reminders for appointments?
Email reminders are native to Appointlet. SMS isn’t, but you can add it through Zapier in about ten minutes.
The Zap could look like this: a new booking triggers a text message to the client a set number of hours before the appointment. You can use Twilio or ClickSend on the back end. Both are inexpensive (a few cents per text) and reliable.
This is one of the highest-impact automations on the list. Text reminders cut no-show rates significantly across appointment-based businesses, and most clients prefer them to email, especially for appointments they booked weeks ago and forgot about.
Here’s the Twilio setup, step by step.
- Create a free Twilio account and buy a phone number from inside Twilio (usually a few dollars a month).
- In Zapier, build a Zap where the trigger is a new Appointlet booking confirmation, and the action is Twilio sending an SMS.
- Write the message once, with merge fields for the client’s first name, appointment date, and time (something like “Hi {first_name}, this is a reminder for your appointment on {date} at {time}. See you soon.”).
- Use Zapier’s delay step to schedule the text to send 24 hours (or anytime you want) before the appointment.
- Save the Zap, and every future booking will automatically receive a reminder.
The pre-built Zap for Appointlet and Twilio first reminders will get you most of the way there. You just edit the message and the timing.
That same page has a long list of other Appointlet and Twilio workflows too, like sending a second reminder the morning of, a thank-you text after the appointment, or a custom message when a VIP tag is applied.
You can check it out for more information, or visit the Appointlet page on Zapier to see other SMS apps you can use.
If your phone is ringing more than you can answer (which is a real problem for most appointment businesses), Rosie is an AI answering service that can handle missed calls and book appointments on the spot. We’ve written about why that’s useful for appointment businesses too.
What do I do when I don’t have to automate all eight?
You probably won’t, and that’s fine.
Pick the one that wastes the most time in your week, set it up this afternoon, and see if it sticks. If it does, set up another one next week. If it doesn’t, try a different one.
You don’t need to automate everything. You just need to stop doing things by hand that software is happy to do for you.
If you want help thinking through what makes sense for your setup, we host office hours every Wednesday at 1:30 PM EST. There’s no agenda or pitch. It’s just a place you can bring your questions.