This article is currently deprecated. We will be reintroducing support for a Google Tag Manager in the near future.
Marketers use Adwords every day to host, monitor and improve upon their Google Ads. Changing a single word can be enough to transform a failing campaign to a successful one. That’s why A/B testing and click tracking are so essential. When the tone is right, these ads will attract the highest quality prospects, leading to improved conversion rates and longer customer lifecycles. We wrote this article to help you understand where Appointlet lives in a standard Google Adwords sales funnel. With this technique, you’ll be able to leverage your sales demos to identify the winning advertisements.
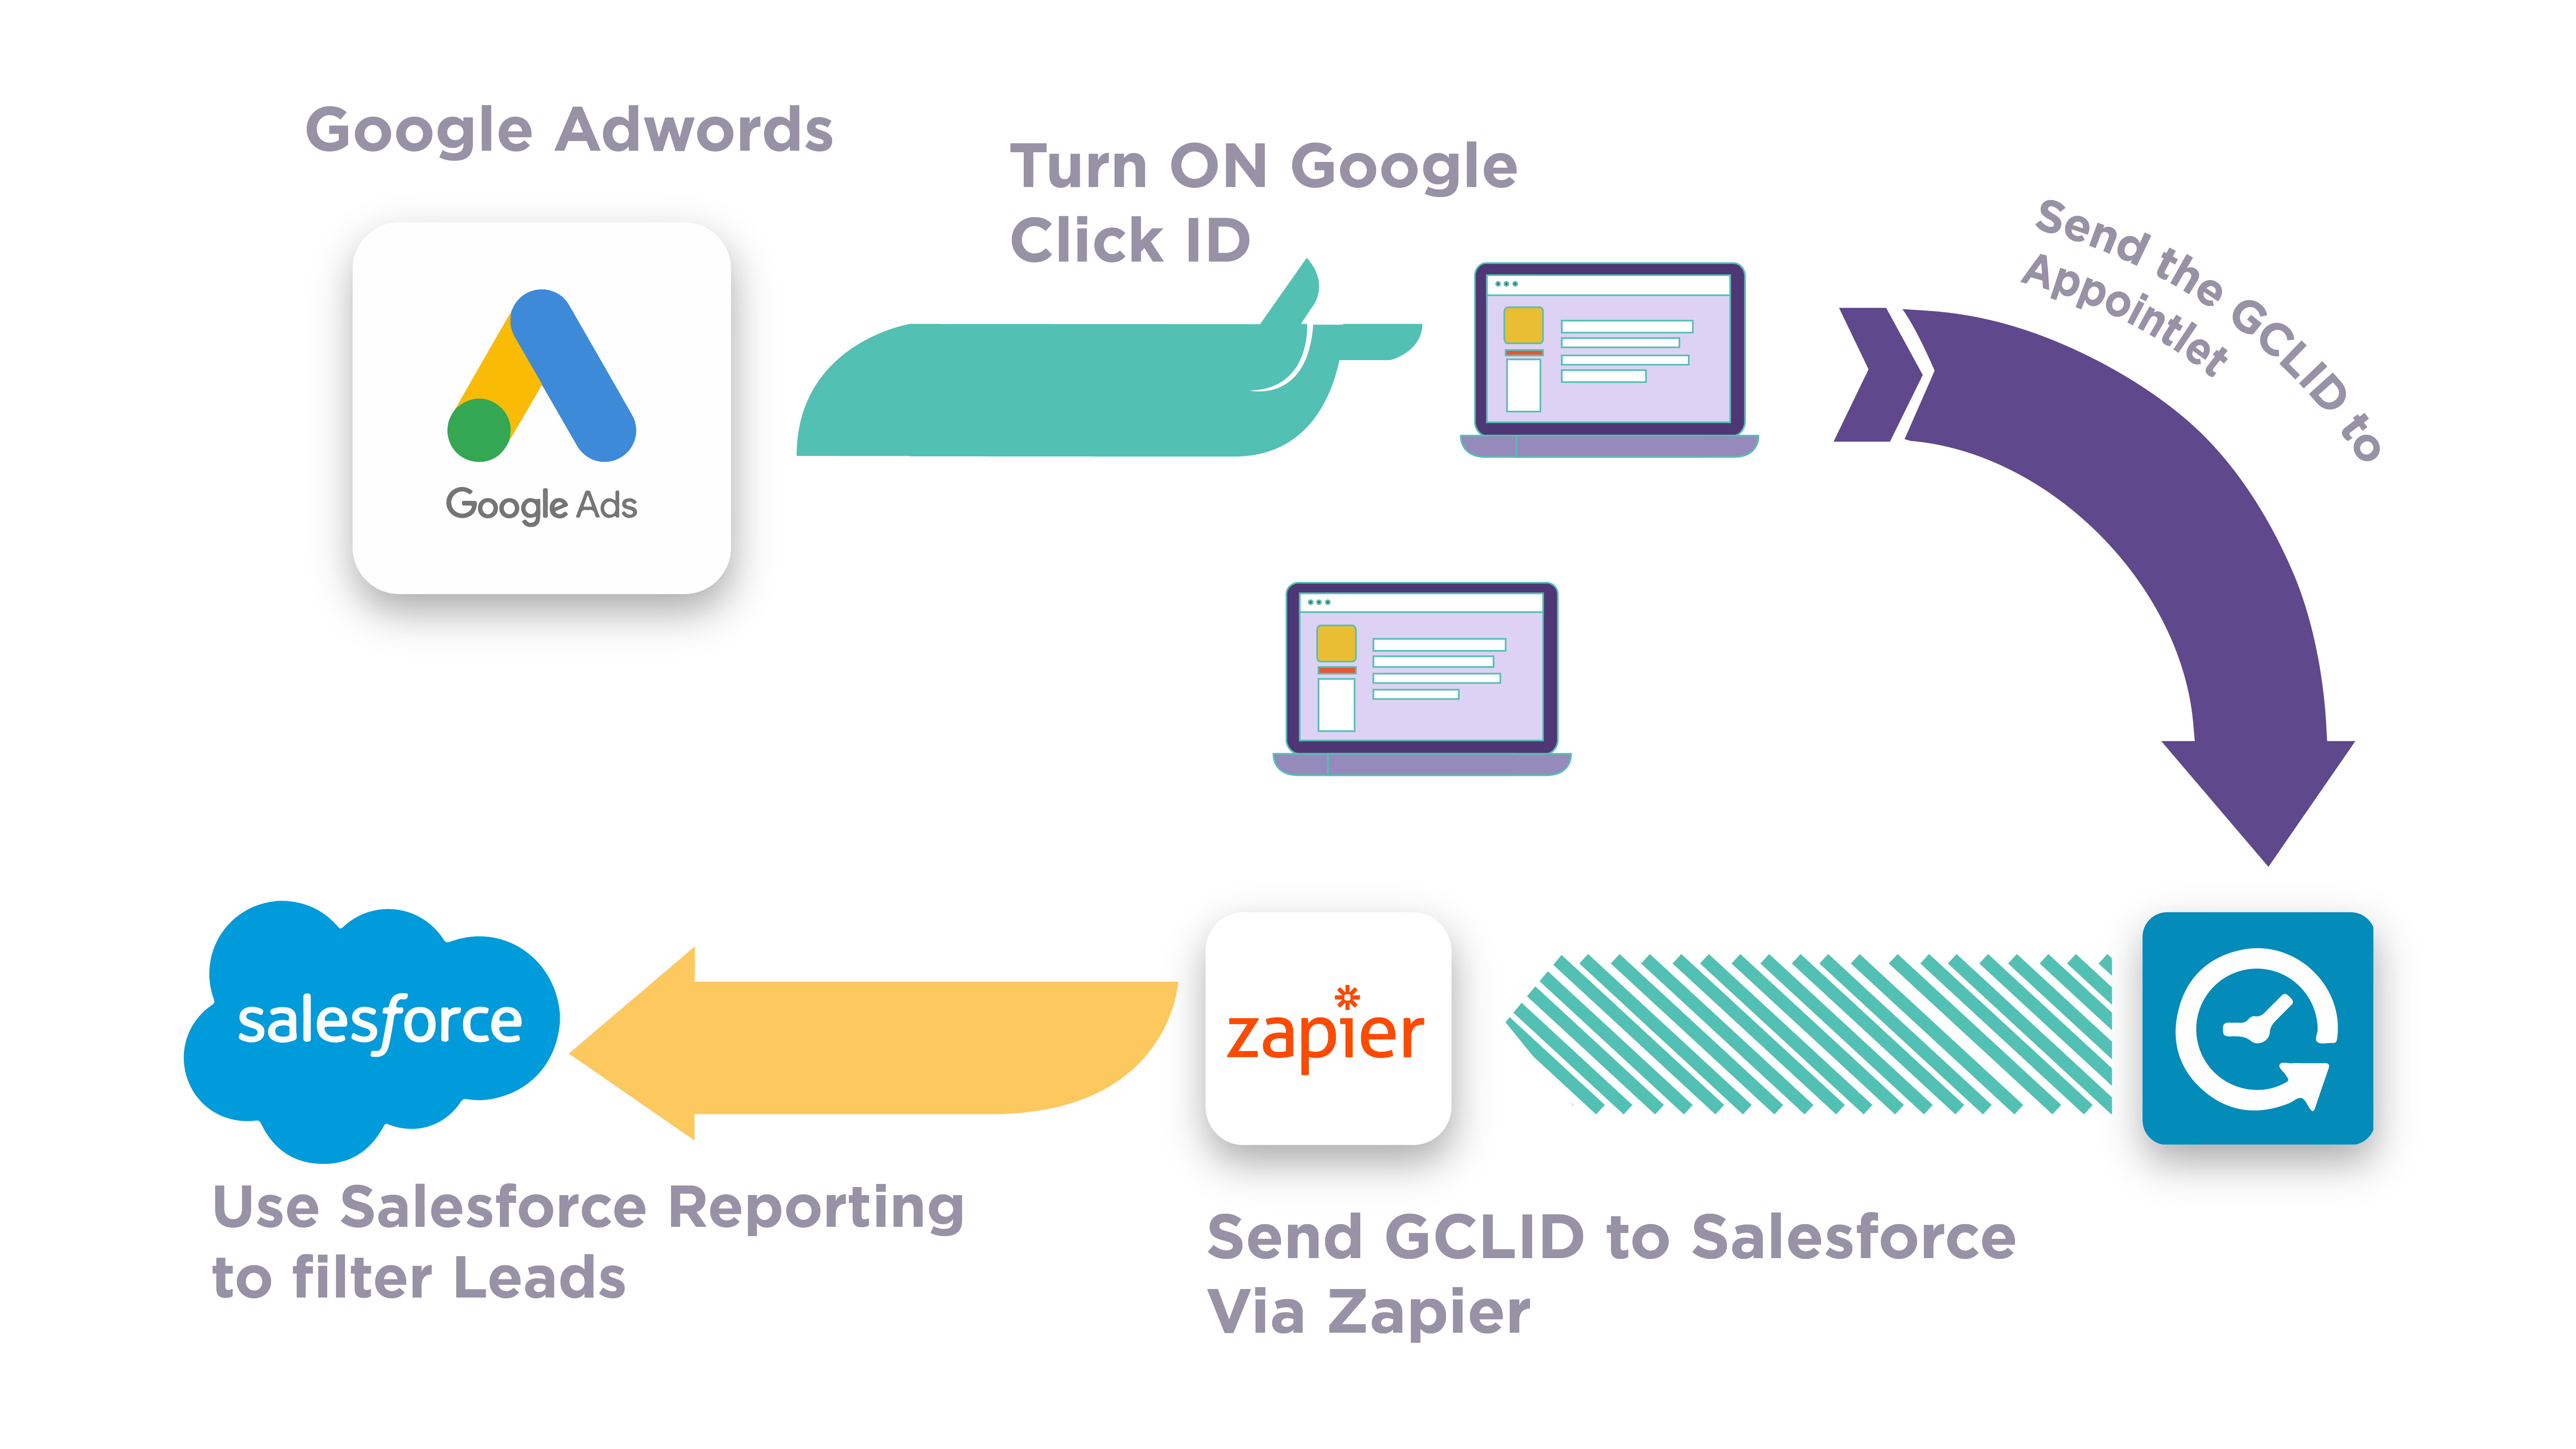
In this article we’ll focus on Google Click IDs (GCLID), a popular tool for tracking the performance and outcome of paid ads. Without the tracking ID, we still have Google’s native metrics for click quantity, but it can be difficult to measure the quality of the leads they produced. GCLID makes it possible to track each ad through the funnel and calculate an average lead score for them. The most successful ads are the ones that attracted and converted the highest number of ideal customers.
The Landing Page, Sales Demos, and a CRM
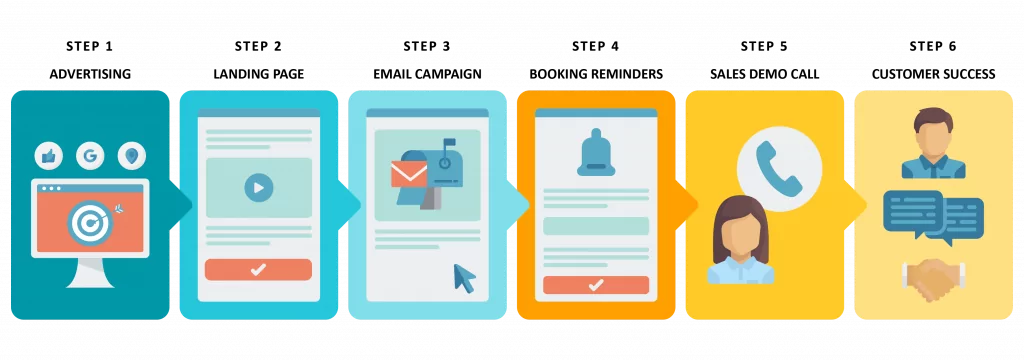
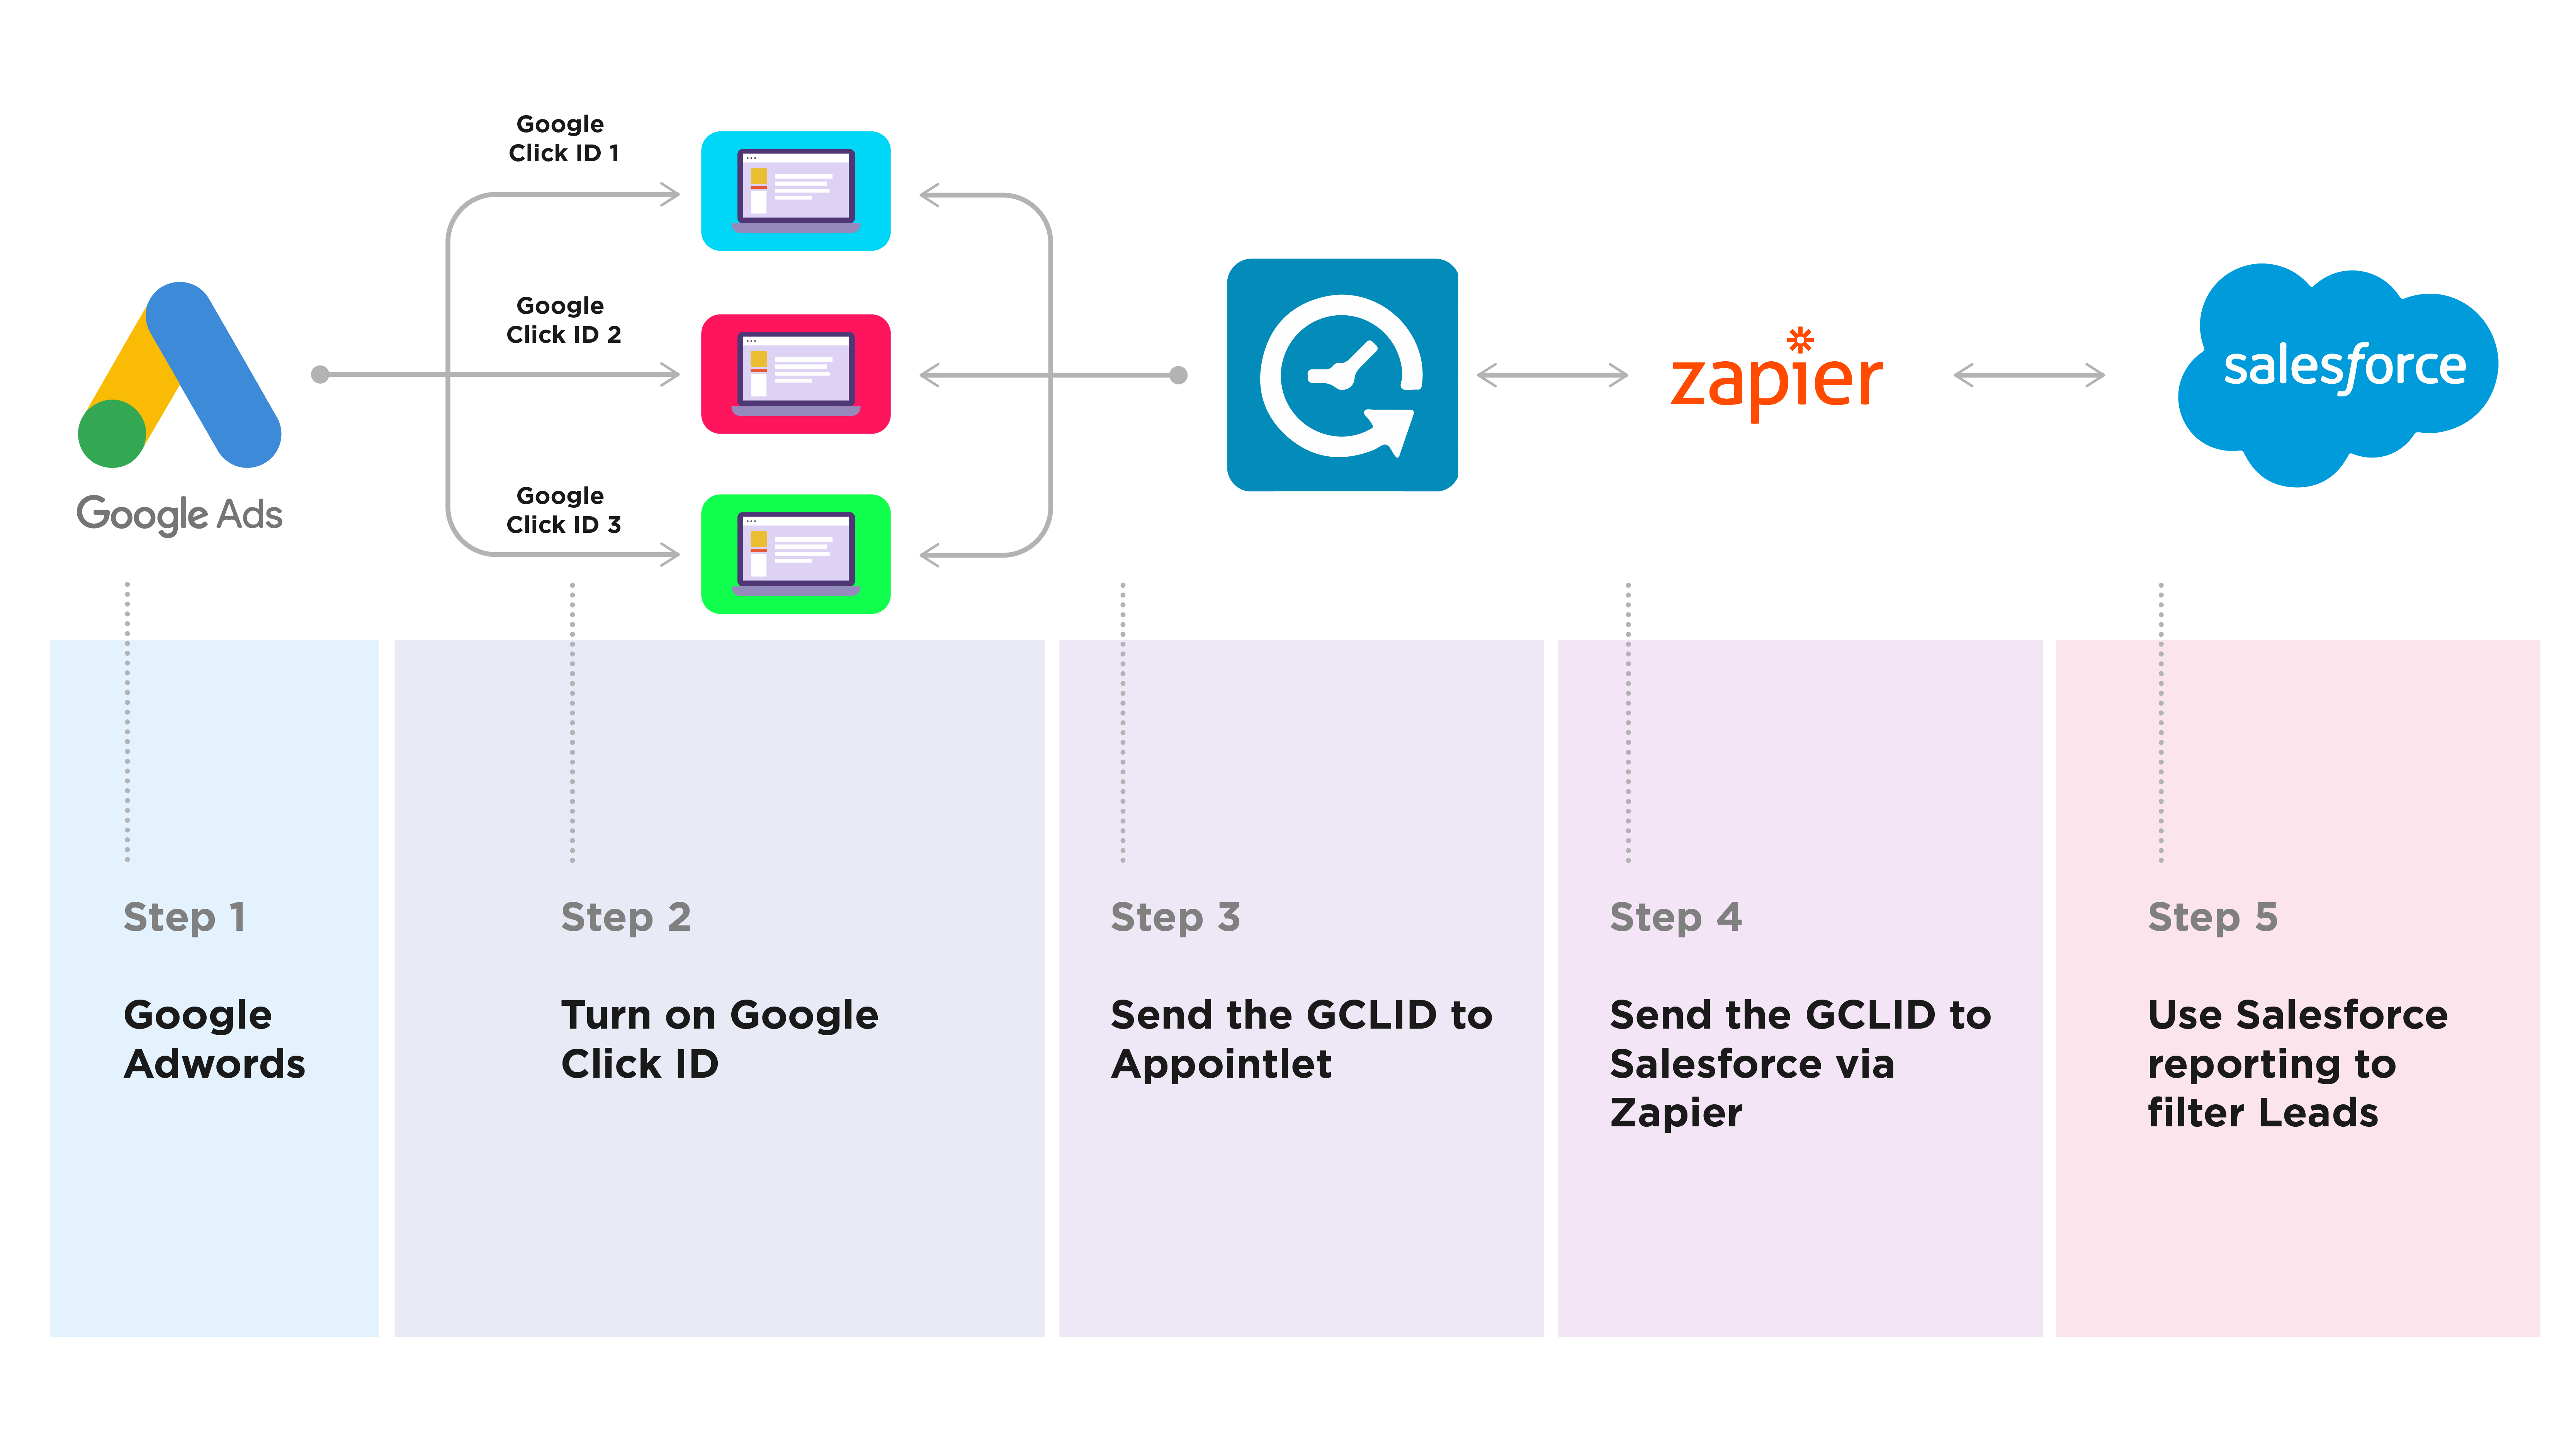
Let’s imagine that your marketing team has taken out three separate Google advertisements that point to a single landing page. You have a limited ad budget, so every dollar counts. It’s tempting to invest heavily in the ad that gets the most clicks, but if your highly-clicked ads are generating low quality leads, they won’t deliver value to your company long term. You need these ad clicks to correspond to qualified prospects. A sales scheduling funnel can help you make the most of GCLID, to figure out precisely which ads converted the best customers.

Let’s zero in on the content of your landing page first. In the sales funnel model, when people click on one of your ads, it’s common to make a value proposition and ask for their email address. If your product or services are enticing enough, people will submit their email address and you can follow up with a sales demo invitation. Appointlet will handle the booking flow for you and capture the GCLID. If the lead declines your invitation, you can continue to share the booking link in your email drip campaign.
Note: If you’re worried about getting flooded with sales demos, we suggest setting up manual confirmation in Appointlet, so your team can approve or decline sales calls as desired. Declined calls will not prevent the intake form data from traveling securely into Salesforce, which means you can still monitor the outcome of each ad campaign.
How to pass GCLID into Appointlet
Fair warning — this is the part of the article where things start to get a bit technical. We’re going to show you precisely how to set up Google and Appointlet to reach your end goal. If you’re not ready to dive into those specifics yet, you can scroll down to the final section titled The Big Payoff.
So to get started, head over to Google Adwords and confirm that Auto-Tagging is turned on in your campaign settings. With that feature activated, people who click on your paid ads will arrive at a landing page with that GCLID in the URL.

Once your ad goes live, anyone who clicks on it will be sent to the landing page of your choice. The GCLID parameter will appended to the URL and looks like this:

With auto-tagging turned on, the next step is to configure Appointlet so that it receives the GCLID. You’ll just need to create a form field, name it “gclid” and mark it as not-visible, so prospects don’t see it when booking with you. The following screenshot shows you what it should look like, with the Visible checkbox deselected.
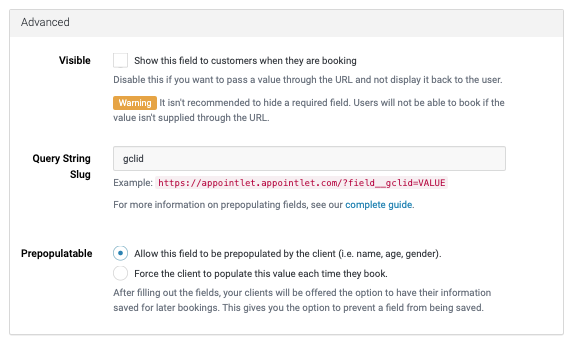
Beneath the visibility checkbox is your Query String Slug URL, which generates the correct format for passing the parsed GCLID string into the field’s value. You can highlight and copy the URL for easy reference. Once you’ve save this form field, it’s time to create some custom code on the landing page.
This is something you’ll need a developer to execute, but it’s not too difficult and we have written out the javascript code, which we hope can help speed up the process. In the HTML codebase of your landers, use this method to capture your window’s current URL (const url), pull out the raw glid value (const regex) and then parse the correct array element (const parsed-gclid). That final const value is equal to the original GCLID value.
const url = window.location.href
const regex = /gclid=([^&]*)/
const parsed-gclid = url.match(regex)[1]
This parsed-gclid variable will hold the lander’s GCLID and can be passed into your booking page URL as follows (variable syntax will vary): https://your-company-name.www.appointlet.com/?field__gclid=parsed-gclid
Now when someone clicks on your ad and they click on the “Book Now” link, the ad’s GCLID will be received by that hidden form field. Upon completing a booking, that GCLID is stored in your Appointlet booking dashboard logs and can be referenced at any time. You can opt to use our CSV export if you want a quick look at how many people booked a meeting from each ad campaign. However, as we mentioned earlier, the best way to manage your data is to pass this booking data into a CRM for sales and study the outcome of your advertisements with their toolset.
Connect Appointlet to Salesforce with Zapier
With the Appointlet booking page collecting a Google Click ID, the final step is to pass that booking data into Salesforce. To do that, we’ll use the designated Zapier integration portal located here.
Salesforce does not provide a GCLID field by default. You will need to create your own custom property in Salesforce, in order to access it in Zapier and pass your Appointlet form’s GCLID data forward. We’ve written a detailed knowledge base article covering how to set up a custom GCLID property in Salesforce and run custom reports, so please review that article if you need assistance.
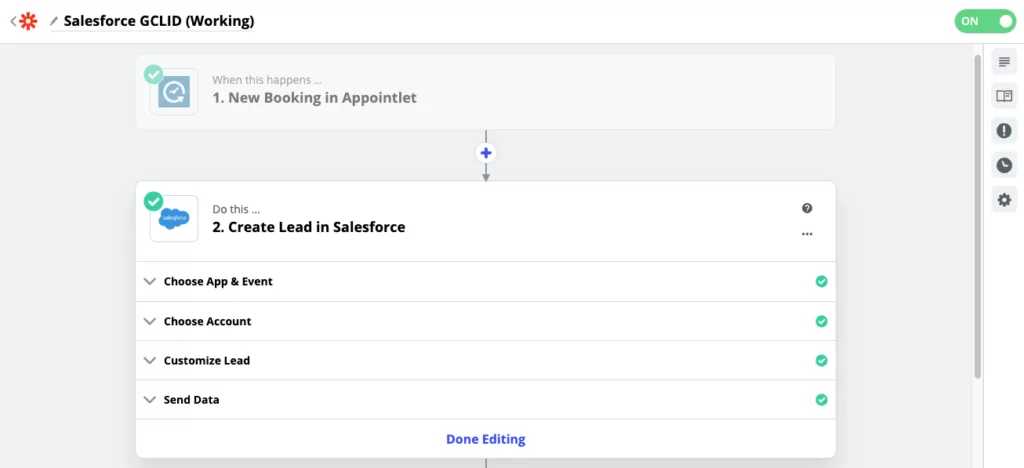
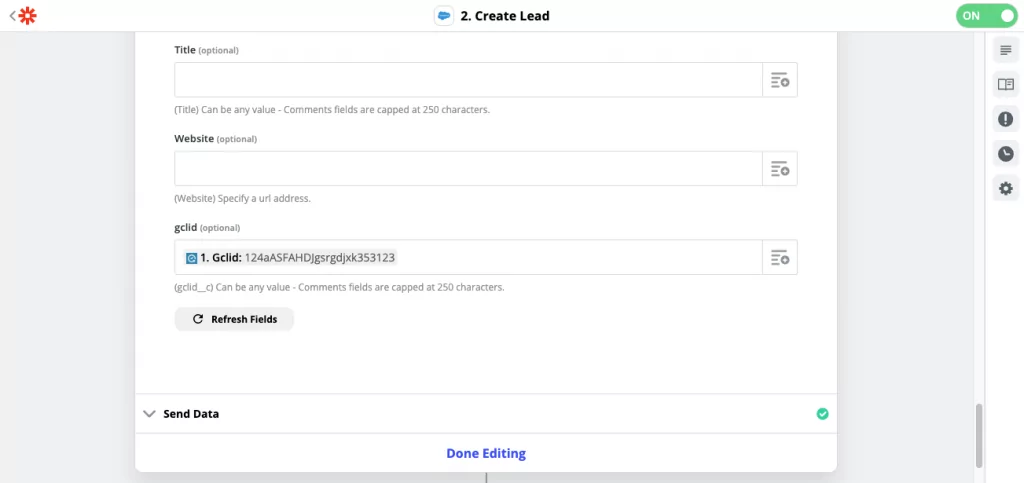
You’ll know when your customer Google Click ID property was created successfully in Salesforce because it will appear at the bottom of the “Customize Lead” section of your Zapier action.
A Second Option: Connecting to Hubspot instead of Salesforce
Signing up for Salesforce and engaging their software can be a lot if you’re not ready to scale up. However, teams that are already using Salesforce may benefit from exploring options like Salesforce VoIP integration to streamline both communication and CRM workflows. For smaller teams who still want to use this method, we can recommend Hubspot as a working alternative. Their Zapier integration includes a GCLID field by default.
Fun fact: We worked directly with Hubspot’s team while writing this article to expose the Google Click ID property to the Contacts list, as it was previously locked in a hidden state and could not be accessed. Now that this has been addressed, it’s a viable alternative to Salesforce CRM. Tada! 🎉
To get started, you’ll integrate with Hubspot using a new booking trigger in Appointlet. The action will create / update a contact in Hubspot:
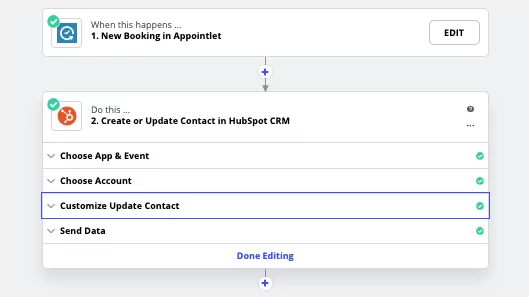
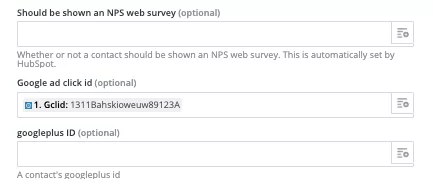
Within the customize Update Contact step of your Zapier action, you’ll see the option to pull in your GCLID field from the booking data:
With your Zap set up and turned on, you can make your first test bookings. To view the GCLID column on your Hubspot Contacts spreadsheet, you’ll just need to expose the google click id property. Start by opening the Contacts section of your account and clicking on the actions button. From there, you’ll edit the columns.
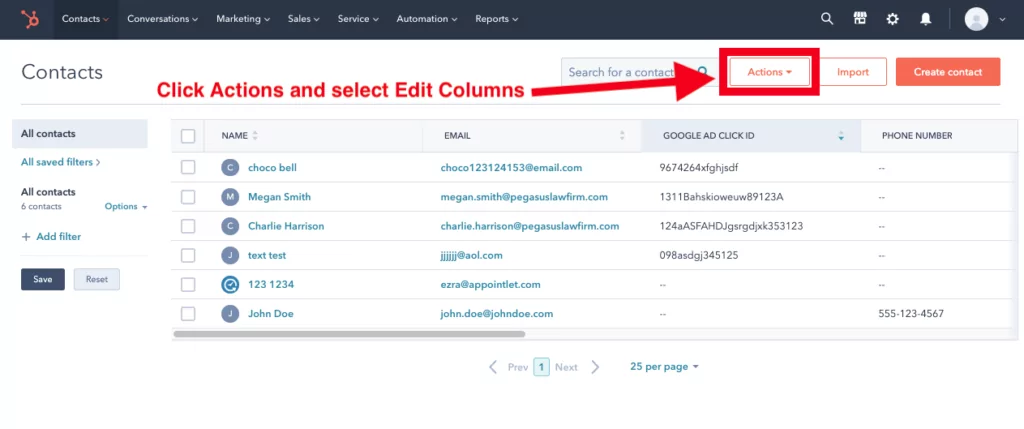
When you get to the column editor screen, type Google into the search bar to access the Google ad click id property. Click the checkbox to select it and add it as a column on the Contact dashboard. If you want, you can also drag the property up on the list, so that it’s closer to the left of the spreadsheet when you return to your Contacts page:
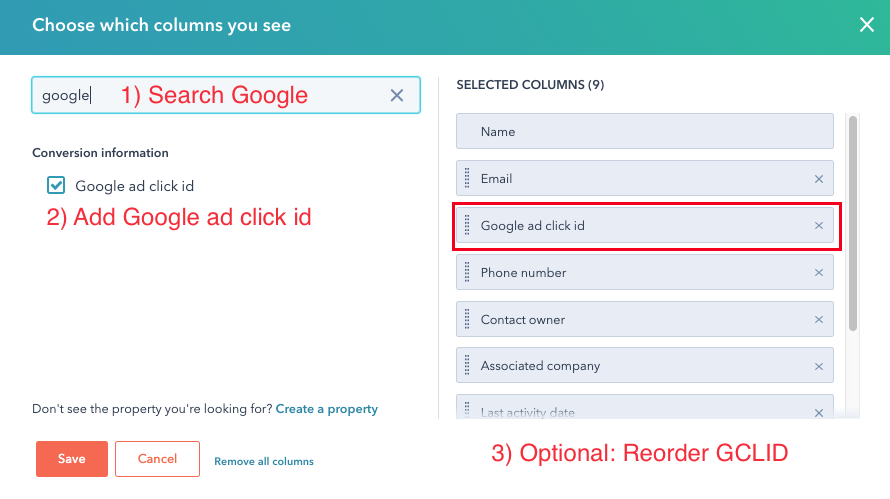
With the Google ad click ID property exposed, you will be able to filter through Contacts and run reports just as you would in Salesforce.
The Big Payoff: Evaluating your Ads
If you made it this far, congratulations. There were a lot of configuration steps but you managed to put it all together. Once you’ve tested the integrations and launch the ad, you’re going to start seeing leads come into Salesforce with a GCLID. You can revisit our instructions on how to generate Salesforce Reports if you need help. The Outline section can be used to expose your GCLID value and the Filter tool will let you limit the leads to those who have a specific GCLID value.
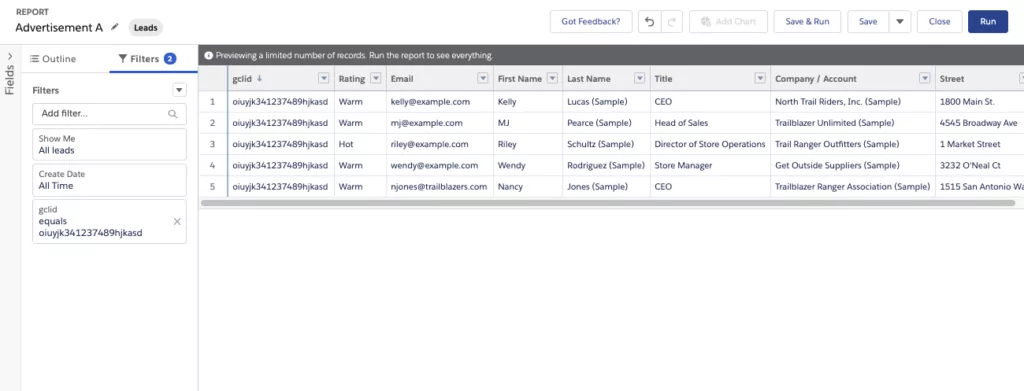
Since each GCLID corresponds to a single ad campaign, you can use this method to quantify the number of leads generated by your ads. Salesforce offers other properties out of the box, like “Rating”, which can be used to establish a lead score and run secondary reports on their readiness to make a purchasing decision. Each time you save and run a report, Salesforce will keep a record in your logs, so you can track their progress over time.
The best way to evaluate Google ads is by the number of qualified leads that booked a sales demo and converted to customers. With this GCLID/Salesforce method, your marketing team will be able to easily quantify ad performance and make adjustments accordingly. Over time, if you iterate frequently and make the right improvements, you should see noticeable improvements in your customer conversion rates and lifetime value. It will take some effort and managerial oversight but it’s worth the investment — good luck!